Redis + Node.js + Socket.io でチャットアプリの動きをつける
概要
何かと必要になりがちなチャットアプリの動きを実装する。
使うのはNodejs、Redis、Websocket。
docker-composeで起動させる。
typescriptで記述するのでその辺の設定についても。
完成物
https://github.com/di-kotobuki/chat
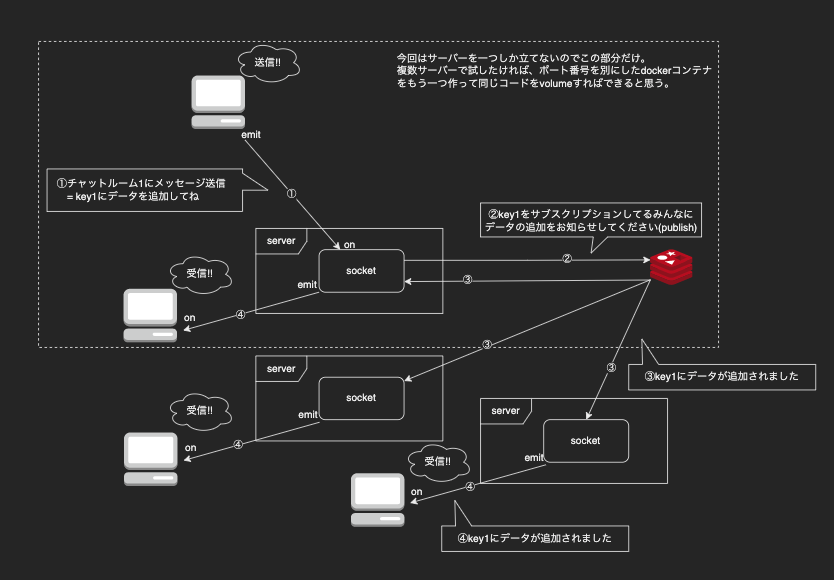
イメージ図
Redisでpub/sub機能を使うと複数サーバー間で同期できる。
サーバー側でRedisに保存されているデータの各キーに対してそれぞれ接続してサブスクリプションさせておくことで、publishされた時にそれが全てのサーバーに伝えられる。
やること
- dockerの構築
- typescriptの準備
- websocketのサーバ側を実装
- websocketのクライアント側を実装
ディレクトリ構造
/
├ app
│   ├ src
│   │   ├ public
│   │   │   ├ index.html
│   │   │   └ style.css
│   │   └ index.ts
│   ├ package.json
│   ├ tsconfig.json
│   └ yarn.lock
├ .gitignore
├ docker-compose.yml
├ Dockerfile
└ README.md
dockerの構築
サーバ用のコンテナとRedisのコンテナを作る。
# docker-compose.yml
version: "3"

services:
  web:
    build:
      context: .
      dockerfile: Dockerfile
    container_name: web
    environment:
      - REDIS_HOST=redis
      - REDIS_PORT=6379
    volumes:
      - ./app:/usr/src/app
    ports:
      - 3000:3000
    tty: true
    depends_on:
      - redis

  redis:
    image: redis:latest
    container_name: redis
    ports:
      - 6379:6379
    volumes:
      - ./data:/data
    command: redis-server --appendonly yes
# Dockerfile
FROM node:16-alpine

RUN apk update && apk add --no-cache libc6-compat && ln -s /lib/libc.musl-x86_64.so.1 /lib/ld-linux-x86-64.so.2

WORKDIR /usr/src/app
COPY ./app/package.json ./app/yarn.lock ./
RUN yarn install

COPY ./app ./

EXPOSE 3000
typescriptの準備
サーバはtypescriptで記述したいので必要なnodeパッケージをインストールしたり、ビルドの設定を行う。
初期化
必要なnodeパッケージをインストール。
cd app
npm init -y
yarn add typescript
tsconfig
tsconfig.jsonを作成して編集する。
cd app
npx tsc --init
これでtsconfig.jsonが生成されるので、末尾にincludeとexcludeを追加してtargetとoutDirを変更。
# /app/tsconfig.json
{
  ...,
  "target": "ES6",
  "outDir": "./dist",
  ...,
  "include": [ "src/**/*" ],
  "exclude": [ "node_modules" ]
}
ビルド設定
編集するたびにビルドと起動をしなくてもいいようにホットリロードの設定。
cd app
yarn add -D ts-node ts-node-dev rimraf npm-run-all
そして、package.jsonを編集。
# app/package.json
{
  "name": "chat",
  "version": "1.0.0",
  "description": "",
  "main": "dist/index.js",
  "scripts": {
    "dev": "ts-node-dev --respawn src/index.ts",
    "build": "npm-run-all clean tsc",
    "start": "node ."
  },
  // 省略...
}
起動確認
さっきpackage.jsonで"dev": "ts-node-dev --respawn src/index.ts"としたので、app/src/index.tsを作成して適当に編集。
# app/src/index.ts
console.log("hello world");
yarn devでindex.tsを編集するたびにホットリロードされることを確認できる。
cd app
yarn dev

Socketのサーバー側
さっきのindex.tsにwebsocketの記述をしていく。
必要なパッケージ
ioredisとsocketをインストール。
NodejsでRedisを使うならioredisがいいらしい。
Websocketを使用するためのsocket.io。
Nodejsのフレームワークといったらのexpress。
POSTメソッドのリクエストでパラメータをパースするためのbody-parser。
日時の処理がしたいのでmoment。
cd app
yarn add ioredis socket.io socket.io-client express body-parser moment
yarn add -D @types/ioredis @types/socket.io @types/express
コード
大まかに、redisへの接続とwebsocketの実装を行う。
redisに保存できるデータ型はいくつかあるが、今回はチャットが送られた順番も大事なのでソート済セット型を使う。
ソート済セット型は「キー」「スコア」「値」から構成され、チャットを例に挙げるとキーがチャットルームID、スコアがチャット送信日時、値がチャット内容にあたる。
キーはデータベースのテーブルにあたると考えると理解しやすいかもしれない。
キーの数だけredisとの接続を行って、各接続でそれぞれのキーにおいてサブスクリプションさせる。チャットルームが閉鎖された時は該当するキーへのサブスクリプションを行っているredisへの接続を切断したらいい。
websocketはクライアント側からのメッセージ送信などのイベントを受け取り、redisへのデータ保存や他のクライアントへの転送を行う。
双方向でのやりとりができ、一方のemitに他方のonが呼応する関係。
一方でemit("hoge")を実行すると他方でon("hoge")が実行される。
# app/src/index.ts
import express from "express";
import * as http from "http";
import * as socketio from "socket.io"
import Redis from "ioredis";
import moment from "moment";
import bodyParser from "body-parser";


// 環境変数
const redis_host = process.env.REDIS_HOST;
const redis_port = parseInt(process.env.REDIS_PORT || "6379", 10);

const app: express.Express = express();
const server: http.Server = new http.Server(app);
const io: socketio.Server = new socketio.Server(server);
const redis: Redis = new Redis({ host: redis_host, port: redis_port });
const subscribers: Record<string, Redis> = {};

(async () => {
  // publicフォルダに静的ファイルを格納
  app.use(express.static("src/public"));

  // POSTのリクエストボディ
  app.use(bodyParser.urlencoded({
    extended: true
  }));
  app.use(bodyParser.json());

  // 全てのkeyを取得
  const keys = await redis.keys("*");
  for (let i = 0; i < keys.length; i++) {
    await addSubscriber(keys[i]);
  }

  // チャットルーム作成
  app.use("/create", async (req, res) => {
    const { key, id } = req.body;
    const date = moment.now();
    const message = { id: id, text: `NEW CHANNEL: ${key}`, date: date };
    await redis.zadd(key, moment.now(), JSON.stringify(message));
    await addSubscriber(key);
    res.send({ name: key, messages: [message] });
  });

  // チャットルーム閉鎖
  app.use("/delete", async (req, res) => {
    const { key } = req.body;
    subscribers[key].disconnect();
    delete subscribers[key];
    res.send("ok");
  });

  // チャットルーム取得
  app.use("/get", async (req, res) => {
    const keys = await redis.keys("*");
    const rooms = [];
    for (let i = 0; i < keys.length; i++) {
      const result = await redis.zrange(keys[i], 0, -1);
      const room = {
        name: keys[i],
        messages: result.map((msg) => JSON.parse(msg))
      }
      rooms.push(room);
    }
    res.send(rooms);
  })

  // Redis接続時の処理を登録
  io.on("connection", (socket: socketio.Socket) => {
    // クライアント側からのメッセージ送信を待ち受ける
    // クライアント側: socket.emit("send", { key: channel, id: id, text: text })
    socket.on("send", async (data) => {
      const date = moment.now();
      const message = JSON.stringify({
        id: data.id,
        text: data.text,
        date: date
      });
      await redis.zadd(data.key, date, message);
      await redis.publish(data.key, message);
      console.log(`メッセージ送信: ${message}`);
    });
  });

  server.listen(3000, () => {
    console.log("listening on *:3000")
  })
})();

// subscriberを追加
async function addSubscriber(key: string) {
  const client = new Redis({ host: redis_host, port: redis_port });
  await client.subscribe(key);
  client.on("message", (_, msg) => {
    // クライアント側: socket.on(room_name, (message) => {})
    io.emit(key, JSON.parse(msg));
    console.log(`メッセージ転送: ${msg}`);
  });
  subscribers[key] = client;
}
Socketのクライアント側
htmlとか結構長くなってしまうので、websocketやajaxに関する記述のみ記載
# app/src/public/index.html
<!-- importmapでcdn読み込み -->
<script type="importmap">
  {
    "imports": {
      "socket.io-client": "https://cdn.socket.io/4.4.1/socket.io.esm.min.js",
      "axios": "https://cdn.skypack.dev/axios"
    }
  }
</script>
<script type="module">
  import { io } from "socket.io-client";
  import axios from "axios";

  (() => {
    // io()の引数は接続するwebsocketサーバーのホストだが、今回はこの同じdockerコンテナの中なのでio()でいい。
    const socket = io();

    async function init() {
      document.getElementById("send").addEventListener("click", async () => {
        const el = document.getElementById("send_text");
        // サーバ側: socket.on("send", async (key: string, id: number, text: string) => {})
        await socket.emit("send", { key: channel, id: id, text: el.value });
        el.value = "";
      })
    }

    // メッセージ受信
    async function receiveMessage(room_name) {
      // サーバ側: io.emit(key, JSON.parse(msg));
      socket.on(room_name, (message) => {
        // メッセージ受信時の描画処理
      });
    }

    // チャットルーム取得
    async function getRooms() {
      axios.get("/get")
      .then((response) => {
        const rooms = response.data;
        for (let i = 0; i < rooms.length; i++) {
          // 取得したチャットルームでのメッセージを受信できるように設定
          receiveMessage(rooms[i].name);
          // チャットルーム取得時の描画処理
        }
        console.log(response);
      })
      .catch((error) => {
        console.log(error);
      });
    }

    // チャットルーム作成
    async function createRoom(room_name) {
      axios.post("/create", {
        key: room_name,
        id: id
      })
      .then((response) => {
        // 作成したチャットルームでのメッセージを受信できるように設定
        receiveMessage(room_name);
        // チャットルーム作成時の描画処理
      })
      .catch((error) => {
        console.log(error);
      });
    }
  })();
</script>
おわり
なんだかんだで二週間くらいかかってしまったけど、websocketの記述とredisを少しわかることができたのでよかった。
参考
Amazon ElastiCache for Redis を使ったChatアプリの開発 | Amazon Web Services ブログ